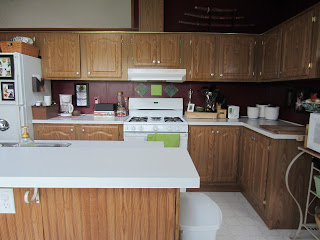
So here is what I was starting with. The most obvious problem was the outdated wallpaper. Normally I love the green/magenta color combo but this pattern was just too busy for a kitchen and the shades where a little hard to match. I also hated the cabinets but replacing them was out of the question and the thought of painting each one stressed me out so I decided to leave them for the time being. Now I'm glad I did because they don't look half bad in the finished room.
As with most room makeovers, I find inspiration from paint colors first. For me, I just get an idea of what color I want to use and work from there. Paying homage to the tacky paper walls, I decided to go with magenta - just a deeper, richer, bolder magenta.
 |
| The artwork was a wedding present I wasn't sure what to do with - it also hides an outlet I don't use. |
The bar table and chairs above were donated by my mother. She was actually going to throw them away after buying a new set so I jumped right in to pick them up. They needed a lot of TLC, or should I say a lot of paint, but they turned out great. The table was straight out of the 80's with blindingly bright metal and black top and the chairs, well, had seen better days...
In all, it took about 3 coats of paint to cover completely (especially the metal). I used Rustoleum in Kona Brown that I had left over from this project: Dictionary Decoupage - fabulous writing desk makeover
In order to break up the space a little, I moved my baker's rack next to the counter (it was sitting where the bar table is now) and used an old tablecloth hot glued on the back to hide my craft area -post on that to come. The microwave fit perfectly on the shelf which cleared up some much needed counter space. The green baskets were ones I had on hand but I did purchase the smaller wicker ones from the dollar store to stash extra packets/spices. Using large wooden bowls filled with potatoes and other root veggies, basic food staples are turned decorative.
By bringing in a rug I had in the master bath, I brought the wall color down to the floor, tying everything together. You can also see in this pic how I streamlined the front of the fridge with different sized picture frames. For more details check out this link: Stuck Like Glue - magnets and frames = clutter free fridge
Here's one from the other direction. You can see the all the natural light I'm blessed to have. Luckily I had several panels of sheer green curtains that I normally hang in the living room during the summer that found a new home. You can also see the hardware was spray painted metallic silver to go with the sink.
 |
| On the back of the counter you can see the green tray I found at Walmart for only $1 - colorful way to hold fruit. |
This is where the microwave sat before and can I tell you, I am so glad to have this space back. Not being a coffee drinker, the sight of the coffee pot has always annoyed me so by putting it in the corner, it kinda gets lost next to the refrigerator (yeah!). Paper plates and paper towels are nicely contained in a leather bound basket (I found that at a yardsale as well awhile ago) and glass canisters look more like decor while they are holding colorful tea bags and bottle caps. The black box was a great find at an estate sale recently. For only $1 I was able to stash away all the medications that we take on a daily basis in style. Yet, perhaps my favorite thing in the whole room is the DIY artwork. I took a three part picture frame that I've had for years, backed it with a plain white piece of paper and just laid in a peacock feather I had in a flower arrangement. You can also see I used more Mod Podge to cover the outlet covers.
 |
| Here is a close up of the box. I kind of liked the natural distressing so I decided not to paint it. |
 | |
| Works perfect! |
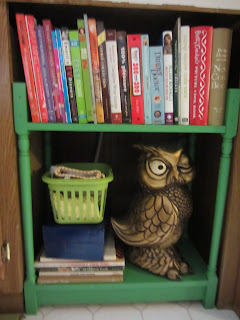
I hate to admit it, but our dishwasher has been broken for over 3 years and we have manged to do nothing about it. Nothing. We didn't get a new one and the old one became a catch all for mismatched Tupperware. Realizing that my husband would never actually get around to buying me a new one, I took it upon myself to make do with what I had. Pulling out the tool belt, I unhooked and removed the smelly, ancient appliance and took it to the dumpster. Seeing that I now had a huge hole in my kitchen with endless storage possibilities, I set out to find something to fill in the space. It wasn't as hard as I thought. I found a wooden shelf for $3 at Goodwill that looked like a Grandma had designed it, heart shaped top and all. All I did was remove the top section, paint it with green craft paint and slid it into place.
My cookbooks were now front and center and yet another yardsale find added some needed height (I love my $3 owl!). I picked up the photo box on a clearance rack for $2 and it holds extra recipes like a charm and plastic Dollar Tree basket becomes oven mit storage.
If I had my way, I would do a complete kitchen remodel; replace all cabinets and counters, lay wood floors, hang new lighting fixtures...but that is just not realistic. But for my life and my budget (which is practically nothing) I used a little creativity, a DIY attitude and a ton of paint to transform a dreadful room into a place I can now enjoy with my family.
Ready for the breakdown?
1 gallon magenta paint - $24.97
1 gallon brown paint - $24.97
pack of scrapbook paper - $5.00
plastic tray - $1.00
spray paint - $3.17
baskets - $3.00
decorative box - $1.00
large owl - $3.00
photo box - $2.00
thrift store shelf - $3.00
tiles - $1.80
picture frames on fridge - $2.00
jute - FREE
artwork - FREE
extra baskets - FREE
bar table and chairs - FREE + leftover paint
rug - FREE (although I'll have to find one for my bathroom now)
TOTAL COST - $74.91


No comments:
Post a Comment