First I removed EVERYTHING from top to bottom and gave it a good cleaning then took inventory of what I had. All children's artwork was sorted and set aside to be hung up on a bulletin board in the craft area or tossed; problem one solved.
Next I controlled the paper clutter by repurosing a cereal box as sort of a magnetic file folder - check out how I did it here: Magnetic Organization Anything that wasn't needed in the kitchen was put where it belonged or stashed out of sight.
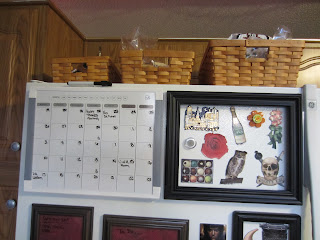
The top of the fridge needed some work too. Like most people, I used mine as a catch all for odds and ends that had no real place to call home. I had three really nice baskets that I was just dying to find a use for. They once belonged to my son, with Winnie the Pooh liners but I reclaimed them when his room outgrew Pooh. Once the liners were removed they were a blank slate. The largest was the perfect size to hold two loaves of bread side by side, the second worked great as storage for tortillas and pitas and the third, and smallest, became a place to contain all the miscellaneous items I didn't want to deal with (chip clips, extra dry erase markers, magnets that had phone numbers on them that I didn't want to look at).
Lastly, was the issue of magnets. I LOVE magnets and have collected quite a few over the years that I have grown fond of, yet no matter how many times I straighten them or try to make them look nice, they always end up looking like a cluttered mess. Especially when small hands get a hold of them and try to "make them look pretty". The solution to my problem was easier than I could have imagined - FRAMES! Not just any frames; dollar store frames! I don't know why I didn't think of this years ago.
Just attach magnetic strips with hot glue and carefully take out the glass and backing.
Use different size frames for more variety.
I took a couple more frames and added scrapbook paper that coordinated with my kitchen colors and had an instant dry erase board. I made one for a grocery list and one as a "to do" list. Just write right on the glass.
...and the finished look! It is in my plans to redo the calender but one step at a time.


No comments:
Post a Comment