Sunday, December 30, 2012

Deck The Halls - wreath made with bargains and scraps

This tutorial is getting posted a little later than I anticipated but my holiday was crazy busy (I'm sure like most of you) and time has just slipped away from me. This Christmas was all about homemade gifts in the Hampton house and I must admit, there was a great sense of pride watching friends and family open a present that was made by either myself or my kids.

This wreath was made for my mom. When I was at her house recently I noticed most of her hanging decor was a tad bit outdated and that was all the motivation I needed to start digging through the craft room.

I started out with a straw base I picked up at Walmart right after Thanksgiving for only $1.00 and wrapped it with some red yarn I had laying around.

The wrapping was a little more involved than I figured it would be and I ended up going around it a couple of times to make sure there were no holes. I used small pins to secure it in place.
  I painted the back of a few wooden stars I picked up at Micheal's, for around 20 cents each, bright red to blend in with the yarn.

 Once the paint was dry I used watered down Elmer's glue to adhere scrapbook paper in a Christmas-y design to the front.

Bow making is definitely not my strong suit but by cutting large, wired ribbon into smaller pieces and then wiring it together, I get the same look as an expensive store bought on with a lot less stress on my part. Check out how I did it here.

Using more pins, I attached two different sizes of gold ribbon and wrapped them around the entire wreath, ending where I started and inserting more pins. Then I took another, longer length of ribbon and made a long loop to be used to hang it.
I took a few dollar store glitter ornaments, cut the strings off and hot glued them to the wreath then attached the stars on top of those. Hot glue the bow on and that was it.
And the finished product...


And she loved it!


Wrapped And Wired - bow tutorial

I HATE making bows but more than that I HATE paying huge amounts of money for bows. I may consider myself crafty but I am not that good at tasks that require me to hold, tuck, pin and wrap at the same time. Normally when I attempt to work with ribbon I end up loosing patience quickly, cuss and throw it in the trash. There must be an easier way.

Well, I figured it out. This may take a few extra steps but overall I think it is much, much easier.

Start by picking a thick ribbon, or thin, just make sure it has wire edges to help hold the shape. Cut it to twice the length you want the loop to be and bring the ends together.
Using floral ribbon, tightly wrap the center like you would a loaf of bread.
Continue cutting and twisting until you have at least three sections of bow then attach them all together. This is your first layer.
Using the same process, make 3 more bow sections but this time make the ribbon slightly longer and wire it underneath the first layer.
Lastly, cut a small length of ribbon and make a loop. Place it in the center of the bow and feed wire through the center so you don't see it and twist together on the bottom.

Tip: try to keep the layers spread out so they are not right on top of each other and fluff as you go.

Here is my finished bow on a wreath!


Friday, December 14, 2012

Ripped To Pieces - faux mosaic table top

I have been toying with the idea of a faux mosaic project for awhile now and I'm so glad I finally took the leap. Originally I wanted to cover a small chest of drawers but something about the statement a great coffee table can make made me change my mind.  Problem was I didn't have a coffee table, hmm...

I did have a small round table in the back of a closet that I have been meaning to drop off at Goodwill. It is a great little table - super sturdy - just way too small to be functional.
Well, my mind started spinning about what I could do to make it work. Recently my mom was throwing out an old bar style table and I gladly took it off her hands with the intention of trying to save it. I painted the blindingly shiny metal with a dark brown color and had it in my kitchen for awhile. Problem was, the top was broken off from the base and even after drilling new holes and trying to repair it, it just kept sliding around. Fortunately it was the perfect size for a coffee table and would sit right on top of the smaller table I already had. I added a little rubber shelf liner between the two to minimize movement.
As you can see, the paint on the top of the table was already starting to peal and scrape off (guess I should have sealed it) so I needed to cover it with something. Mosaic! Now I will warn you, this took much longer than I anticipated and more than one Ibuprofen was needed to help my aching back from sitting bent over for so long but the final look is A-MA-ZING! All in all I think it took about three evenings in in front of the TV after my son went to bed.

Wanting to keep the look as random as possible, I dug out my scrap paper box and decided to use only what I already had.
 I cut up several different colors and patterns in varying shapes and sizes. Pretty much I just hacked the crap out of the paper with scissors then used watered down Elmer's glue to apply each piece. I like to call this being "strategically random".
It took some picking and choosing to find what pieces would fit best - just think of it as a big puzzle.
Once the entire table top was covered I sealed it with 3 coats of polyurethane (including the sides).
I can not believe how many people have seen this and thought it was glass and grout! I love it more and more everyday and for absolutely no cost to me, I got a unique piece of furniture my family can enjoy for years.


Tuesday, December 4, 2012

Under $75 - kitchen facelift for next to nothing

Awhile ago I posted Under $25 - how I updated my bathroom for next to nothing and now I'm here to show you how I pulled off another fantastic budget facelift - this time in my kitchen. I apologize for not getting very many "before" pics but once I had the idea in my head to start this project, I jumped right in and didn't think to grab the camera but I promise I took tons of "afters".

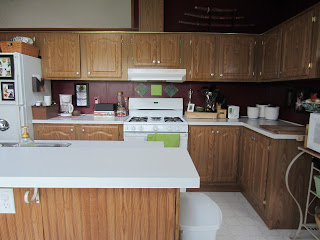
So here is what I was starting with. The most obvious problem was the outdated wallpaper. Normally I love the green/magenta color combo but this pattern was just too busy for a kitchen and the shades where a little hard to match. I also hated the cabinets but replacing them was out of the question and the thought of painting each one stressed me out so I decided to leave them for the time being. Now I'm glad I did because they don't look half bad in the finished room.
As with most room makeovers, I find inspiration from paint colors first. For me, I just get an idea of what color I want to use and work from there. Paying homage to the tacky paper walls, I decided to go with magenta - just a deeper, richer, bolder magenta. 
The artwork was a wedding present I wasn't sure what to do with - it also hides an outlet I don't use.
 The red turned out fantastic and really transformed the whole look, however, once the cupboard area was freshly painted the opposite wall didn't quite mesh. After much debating with my husband over what color would "go" best, we finally compromised on a warm cork (he doesn't give his opinion often on decorating matters so I try to give him some say now and then) and since there are so many windows in the room, it doesn't feel too dark.
The bar table and chairs above were donated by my mother. She was actually going to throw them away after buying a new set so I jumped right in to pick them up. They needed a lot of TLC, or should I say a lot of paint, but they turned out great. The table was straight out of the 80's with blindingly bright metal and black top and the chairs, well, had seen better days...

In all, it took about 3 coats of paint to cover completely (especially the metal). I used Rustoleum in Kona Brown that I had left over from this project: Dictionary Decoupage - fabulous writing desk makeover

In order to break up the space a little, I moved my baker's rack next to the counter (it was sitting where the bar table is now) and used an old tablecloth hot glued on the back to hide my craft area -post on that to come. The microwave fit perfectly on the shelf which cleared up some much needed counter space. The green baskets were ones I had on hand but I did purchase the smaller wicker ones from the dollar store to stash extra packets/spices. Using large wooden bowls filled with potatoes and other root veggies, basic food staples are turned decorative. 
For 60 cents a piece, I picked up some plain white tiles at Home Depot and decoupaged bright green scrapbook paper on them to give the idea of a backsplash. And since I already had some on hand, I used white appliance paint all over the range hood to make it look shiny and new (I painted an old chest freezer awhile ago).
By bringing in a rug I had in the master bath, I brought the wall color down to the floor, tying everything together. You can also see in this pic how I streamlined the front of the fridge with different sized picture frames. For more details check out this link: Stuck Like Glue - magnets and frames = clutter free fridge
Here's one from the other direction. You can see the all the natural light I'm blessed to have. Luckily I had several panels of sheer green curtains that I normally hang in the living room during the summer that found a new home. You can also see the hardware was spray painted metallic silver to go with the sink.
On the back of the counter you can see the green tray I found at Walmart for only $1 - colorful way to hold fruit.
The awkward space in the corner of the counter, where the two levels meet, has always been difficult for me to fill. Last summer I purchased two heavy cardboard canisters at a yardsale for 50 cents or so. They have been moved from spot to spot but I finally came to love them after I covered them with some jute I found in my mom's basement. By turning the lids upside down, gluing them together and covering them as well, I made a totally unique and stylish candy dish.
This is where the microwave sat before and can I tell you, I am so glad to have this space back. Not being a coffee drinker, the sight of the coffee pot has always annoyed me so by putting it in the corner, it kinda gets lost next to the refrigerator (yeah!). Paper plates and paper towels are nicely contained in a leather bound basket (I found that at a yardsale as well awhile ago) and glass canisters look more like decor while they are holding colorful tea bags and bottle caps. The black box was a great find at an estate sale recently. For only $1 I was able to stash away all the medications that we take on a daily basis in style. Yet, perhaps my favorite thing in the whole room is the DIY artwork. I took a three part picture frame that I've had for years, backed it with a plain white piece of paper and just laid in a peacock feather I had in a flower arrangement. You can also see I used more Mod Podge to cover the outlet covers.
Here is a close up of the box. I kind of liked the natural distressing so I decided not to paint it.

Works perfect!
A china cabinet that was hiding in the corner in the dining room became a focal point in the back of the kitchen. I lined the back with more scrapbook paper in different greens, reds and oranges to give a burst of color against the brown. All the clutter that had accumulated in there was taken out and sorted and the only thing that went back in was stemware and barware.

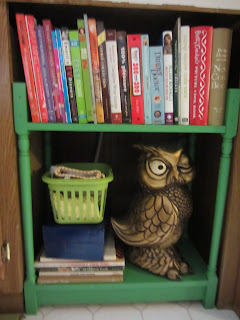
I hate to admit it, but our dishwasher has been broken for over 3 years and we have manged to do nothing about it. Nothing. We didn't get a new one and the old one became a catch all for mismatched Tupperware. Realizing that my husband would never actually get around to buying me a new one, I took it upon myself to make do with what I had. Pulling out the tool belt, I unhooked and removed the smelly, ancient appliance and took it to the dumpster. Seeing that I now had a huge hole in my kitchen with endless storage possibilities, I set out to find something to fill in the space. It wasn't as hard as I thought. I found a wooden shelf for $3 at Goodwill that looked like a Grandma had designed it, heart shaped top and all. All I did was remove the top section, paint it with green craft paint and slid it into place.
My cookbooks were now front and center and yet another yardsale find added some needed height (I love my $3 owl!). I picked up the photo box on a clearance rack for $2 and it holds extra recipes like a charm and plastic Dollar Tree basket becomes oven mit storage.
If I had my way, I would do a complete kitchen remodel; replace all cabinets and counters, lay wood floors, hang new lighting fixtures...but that is just not realistic. But for my life and my budget (which is practically nothing) I used a little creativity, a DIY attitude and a ton of paint to transform a dreadful room into a place I can now enjoy with my family.
Ready for the breakdown?

1 gallon magenta paint - $24.97
1 gallon brown paint - $24.97
pack of scrapbook paper - $5.00
plastic tray - $1.00
spray paint - $3.17
baskets - $3.00
decorative box - $1.00
large owl - $3.00
photo box - $2.00
thrift store shelf - $3.00
tiles - $1.80
picture frames on fridge - $2.00

jute - FREE
artwork - FREE
extra baskets - FREE
bar table and chairs - FREE + leftover paint
rug - FREE (although I'll have to find one for my bathroom now)

TOTAL COST - $74.91

Monday, December 3, 2012

Simply Salvaged - a dramatic entryway

Every home has that one awkward wall or corner where nothing fits or looks right. For me, the shape of my living room has always proved to be a decorating challenge. With the front door in the corner, I have always used furniture to block off the different areas -entryway/living room- yet, there was still one wall that didn't quite work.

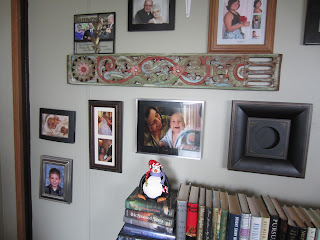
A low bookshelf has been there for awhile so I decided to take it one step further and make books more of a focal point. I searched my house for awhile looking for something I could use as more shelves but found nothing, so I gave up. A couple days later, at 11 o'clock at night, I had a brainstorm; what about those odd vintage wooden boards my father-in-law gave me? Originally they were an old headboard that, sadly, fell off the roof of his truck while delivering it to me. All that was salvaged was three beautifully carved and colorful boards that have been stashed in the backroom for over a year waiting for their purpose to become known.

The longer piece would work as a shelf perfectly and I just happened to have two brackets in the closet. By hanging it high on the wall, I was able to see only the bottom/pretty part of the wood and still use it for a function. The two smaller pieces were set aside for a moment longer.

While pondering what else to do with the space I asked myself'; what goes with books? All I could think of was large bookcases are often accessorized with picture frames and other knick knacks. That is when it all fell into place. I hung the other two boards parallel to the larger one, but flush on the wall, to break up the surface a little. Then I grabbed all the extra framed photos I had in the house and began randomly hanging them. Lastly, I added a few decorative items and took a step back to take a look. Finally, the entrance to my home not only looked good - it was dramatic! I have had so many compliments on what I did I decided to share it. Hope you enjoy!


Dictionary Decoupage - fabulous writing desk makeover

Years ago I was given a decent writing desk by a family friend that was moving and couldn't take it with her. At the time my small apartment was unremarkable and under-furnished so I was extremely grateful for the new addition but as time has gone on, and homes have changed, I have come to realize that blond wood is just not my style. I have always liked the lines of the piece and the size is great but the color never fit in with the rest of my house. I'm sad to say it took me so long to makeover this desk but the end result is well worth the wait.

Here is what I was starting with. 
First thing I did was choose a deeper paint color that would work with the dark wood furniture I had throughout the house. I went with Rustoleum Kona Brown - which I love because it adheres to anything with no sanding required.
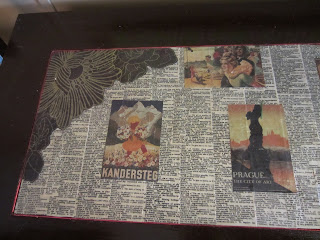
I only painted the sections that would not be covered and made sure I had 3 thick coats on. It only seemed fitting, that since this was a writing desk my decoupage medium should have to do with words - dictionary pages! Goodwill had one that was screaming to be cut up for only 59 cents.
The flat sections were a cinch to do - just cut paper to size, brush on Mod Podge, smooth on paper, apply more Mod Podge, let dry - however, the legs proved to be a more tedious job that spanned more than one night. I ended up just cutting strips of paper in varying sizes and tried my best to keep the words vertical.
Once all the surfaces were covered that needed to be, I took a step back and realized my work was not done yet - it needed something else, some color. Digging through my stash of scrapbook paper, I found a page that looked like old postcards and a couple large abstract flowers that would do the trick.
 Finally I was able to apply a couple coats of polyurethane and give it a home in the dining room.
Yet, the top of the desk had a grove carved into it that did nothing more than annoy me by gathering crumbs and dust. How do I fix it? I thought about filling it with joint compound before I started painted but I wasn't sure I would achieve a smooth finish so once the entire thing was done I used glue and round ribbon/cording to fill in the recessed area.
And since I had extra, I used it to add detail to the legs.

Ready for the big reveal? Don't mind all the Christmas decorations, but here it is...

I even found a chair at the thrift store that went perfectly once I painted it in the same color brown.